
Excel is an amazing tool with fascinating capabilities to analyze data (be it using formulas, charts or dashboards). The ease with which data can be entered and stored in Excel makes it a compelling choice.
In this blog post, I have listed 10 useful Excel Data Entry tips that will make you more efficient and save a lot of time.
#1 Use Excel Data Entry Form
Excel Data Entry form enables you to add records in an existing data set. It gives a pop-up form that can be filled by the user. It is especially convenient when the data set has many columns and would require you to scroll right and left again and again as you key in data points.
Data Form feature is not already available in Excel ribbon. We first need to make it available by adding it to the Quick Access toolbar.
Adding Excel Data Entry Form to Quick Access Toolbar
- Go to Quick Access Toolbar, right-click and select Customize quick Access Toolbar

- In the Excel Options Dialogue box, Select All Commands and Go to Form. Select Form and press Add. This will add the Data Forms Icon to the Quick Access Toolbar.

Using Excel Data Entry Form
- Select any cell in the data range and click on the Data Form icon from the Quick Access Toolbar.
- In the Pop-up Data form, all the column titles are listed vertically. Fill the data to the adjacent text box for each heading.
- Once you have entered the data, press Enter
- Click on New to add new record
Using Excel Data Entry form, you can also navigate through the existing data (row by row), or find data by specifying the criteria (try this by clicking on the criteria button)
#2 Quickly Enter Numbers with Fixed Decimal Numbers
If you are in a situation where you have to manually enter data in excel that also has a decimal part to it, this trick could be mighty useful. For example, suppose you have to enter marks for students in percentage with up to 2 decimal points. You can enable a feature where you just type the numbers without bothering about hitting the dot key every time. To enable this:
- Go To File –> Options
- In the Excel Options Dialogue box select Advanced
- In Advanced Options, check the option "Automatically Insert a decimal point"
- Specify the number of decimals you want (for example 2 in this case)
Now, whenever you enter any number, excel automatically places last 2 digits after the decimal. So 1 becomes .01, 10 becomes 0.1, 100 becomes 1, 2467 becomes 24.67 and so on..

Once you are done with data entry, simply switch it off by un-checking the same option.

#3 Automatically Add Ordinal to Numbers
Yes, you can use a combination of excel functions (such as VALUE, RIGHT, IF, OR) to add ordinals ('st' in 1st, 'nd' in 2nd, and so on..).
Here is the formula:
=A1&IF(OR(VALUE(RIGHT(A1,2))={11,12,13}),"th",IF(OR(VALUE(RIGHT(A1))={1,2,3}),CHOOSE(RIGHT(A1),"st","nd","rd"),"th"))#4 Fill Down Using Control + D
This is a nifty Excel Data Entry trick. If you have to copy the above cell, just press Control + D. It copies the content as well as the formatting. If there is a formula in the above cell, the formula is copied (with adjusted references).
This works for more than one cell as well. So if you want to copy the entire row above, select the current row and press Control + D.
If you select more than one cell/cells, than the cell above selection is copied in all the cells.
#5 Quickly Enter Date/Time in Excel Cells
Do not remember the current date? Don't worry, just press Control + ; (semi-colon Key) and it will enter the current date in the cell.
Similarly, you can enter current time by using the shortcut Control + Shift + : (colon key)
Remember, these are absolute values, and won't change if the date or time changes. If you want to have dynamic date and time value that changes whenever you opne the workbook or when there is a re-calculaiton, use TODAY and NOW functions.
#6 Control + Enter to Fill Entire Selection with Content in Active Cell
When you select multiple cells in Excel, one of the cells with light shade (as compared with the remaining selected cells) is the active cell. If you enter something in the active cell when the selection is made and press Control + Enter, the value is inserted in all the selected cells.
This holds true for formulas as well. If you enter formula in active cell and press Control + Enter, all the cells will get that formulas (with adjusted references).
#7 Alt + Down Arrow to Get a List of All Unique Values in that column
This one can save some time that you might otherwise waste in typing. Suppose you are entering data in a column with activity status (To be Done, Completed). Instead of typing the status again and again, you just need to type it in a couple of cells, and then you can use the keyboard shortcut Alt + Down arrow. It gives you the list all the unique entries, and you can quickly select from the list.
![]()
If you want to select from pre-specified options, create a drop down list using data validation.
#8 Quickly Sift through Multiple Worksheet Tabs in a Workbook
This one saves tons of time. Simply use the keyboard shortcut Control + Page Up/Page Down to navigate through multiple worksheet tabs in a workbook.
#9 Enter Long Text by Using Abbreviations
If you have to enter long names or keywords again and again in your worksheet, this trick would come in handy.
For example, you may want that whenever you type ABC, Excel should automatically replace it with ABC Technology Corporation Limited. Something as shown below:
This feature can be enabled using the autocorrect options. Read how to enable it.
#10 Enter Data in Non-Contiguous Ranges
Suppose you have a template as shown below, and you have to enter data in all the cells highlighted in red, in the order specified by the arrows.
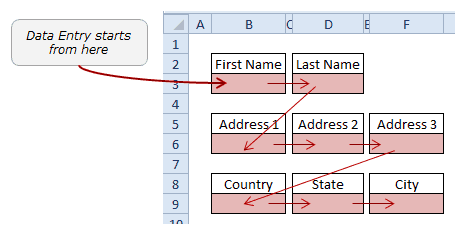
Here is a quick way to do this:
- Select all the cells where you need to enter the data (press control and then select one by one).
- Start with the second cell in your sequence of data entry (start with D3). Select the first cell B3 (where data entry begins) at last.
- Once selected, go to Name Box (which is on the left of the formula bar).
- Type any name without spaces.
- That's It!! Select the Named Range by clicking the Name Box drop down. Now start entering your data and use Enter/Tab to jump to the next cell.
These are my top ten excel data entry tips that can significantly improve your productivity and save time.
Related Excel Productivity Tips:
--
We are also on Face Book, Click on Like to jois us
FB Page: https://www.facebook.com/pages/Hyderabad-Masti/335077553211328
FB Group: https://www.facebook.com/groups/hydmasti/
https://groups.google.com/d/msg/hyd-masti/GO9LYiFoudM/TKqvCCq2EbMJ
---
You received this message because you are subscribed to the Google Groups "Hyderabad Masti" group.
To unsubscribe from this group and stop receiving emails from it, send an email to hyd-masti+unsubscribe@googlegroups.com.
For more options, visit https://groups.google.com/d/optout.
No comments:
Post a Comment